Objective 1.1 Create and modify databases
- 1.1.1 Create databases
- 1.1.2 Import database objects and data
- 1.1.3 Delete database objects
OBJECTIVE 1.1: Contents
1.1.2 Import database objects and data
Whether you start with a blank database or base your database on a template, you can add some or all of your records by importing data. You can also define part of the structure of the data by, for example, using column headings in a spreadsheet as field names in a new table. Data sources you can use include Excel workbooks, other Access databases, text files, XML files, Microsoft SharePoint lists, and Microsoft Outlook folders.
When you import data, you generally have three options: importing the source data into a new table, appending the data to a table that’s already defined, or linking to the data source to create a linked table. When you are importing objects and data as part of creating a database, you use the first of these options in most cases. Access often provides wizards that help you provide the information Access requires to import data from a specific format.
See Also: For information about appending data to a table, see “2.3.2 Append records from external data,” in “Objective 2.3: Manage records in tables.” For information about creating linked tables, see “Create linked tables,” in “Objective 2.1: Create tables.”
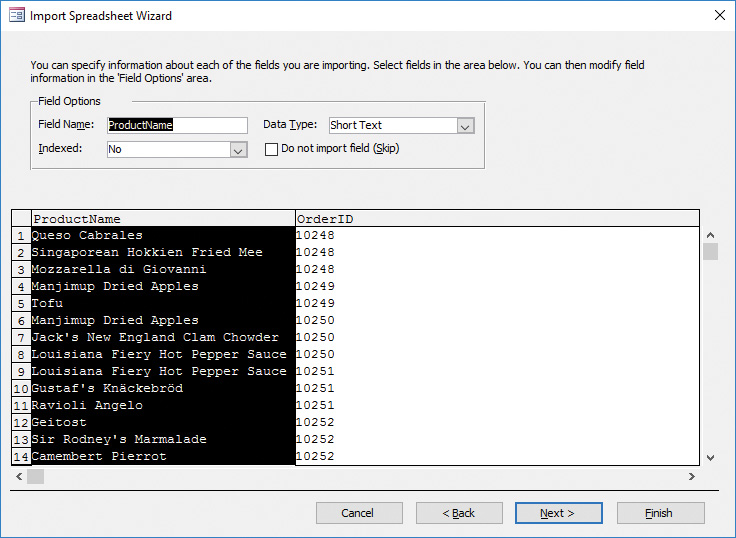
When you import data from Excel into a new table, the Import Spreadsheet Wizard prompts you for information to complete the operation. The wizard first prompts you for the worksheet or the named range you want to import. You can view the sample data that the wizard displays from the worksheet, but you cannot modify it. Access can use the column headings in the worksheet as field names in the database. You can also specify each field’s data type and whether Access should index the field. The wizard’s fourth page provides options for setting the table’s primary key. Access can create an ID field in the table to use as the primary key, or you can select a primary key field or use no primary key in the new table.
See Also: For information about running saved import and export operations, see “Objective 1.5: Print and export data.”
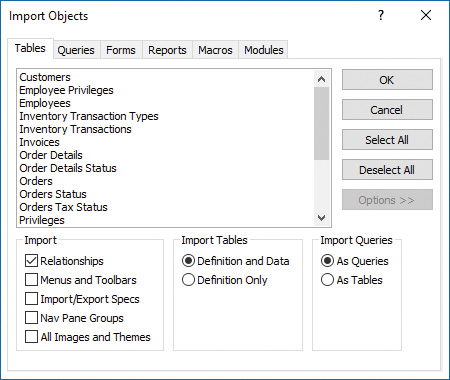
When you import data from another Access database, you can import all the objects in that database or only the objects you select. The Import Objects dialog box shows the tables, queries, forms, reports, macros, and modules in the source database on separate tabs.

Import options control how the data is imported
The available import options are described in the following list:
![]() In the Import area, the Relationships option determines whether table relationships are preserved in the import operation. Selecting the Menus And Toolbars option imports any custom menus and toolbars from databases created in versions of Access prior to Access 2007. Selecting Import/Export Specs includes any import or export specifications defined in the source database. Selecting Nav Pane Groups imports any custom Navigation Pane groups set up in the source database, and selecting All Images And Themes includes these elements with the import.
In the Import area, the Relationships option determines whether table relationships are preserved in the import operation. Selecting the Menus And Toolbars option imports any custom menus and toolbars from databases created in versions of Access prior to Access 2007. Selecting Import/Export Specs includes any import or export specifications defined in the source database. Selecting Nav Pane Groups imports any custom Navigation Pane groups set up in the source database, and selecting All Images And Themes includes these elements with the import.
![]() Options in the Import Tables area control whether you import only the definition of the database objects you select or both the definition of the object and the data. For example, you can import a table with its fields and other properties but no data or include the data in the table. If you are importing objects to create a new database, you might want to import only the definition for a table in which you store project details, but you might want to include the data when you import a table that stores a set of tasks that is common to all projects.
Options in the Import Tables area control whether you import only the definition of the database objects you select or both the definition of the object and the data. For example, you can import a table with its fields and other properties but no data or include the data in the table. If you are importing objects to create a new database, you might want to import only the definition for a table in which you store project details, but you might want to include the data when you import a table that stores a set of tasks that is common to all projects.
![]() The options in the Import Queries area determine whether Access imports a query as a query or as a table. You might import a query as a table when the query’s definition (the fields it includes) forms the basis of a table you want in a new database.
The options in the Import Queries area determine whether Access imports a query as a query or as a table. You might import a query as a table when the query’s definition (the fields it includes) forms the basis of a table you want in a new database.
You can import data from a text file that uses the .txt, .csv, .tab, or .asc file name extension. When you import data from a text file, you work with the Import Text wizard. In the wizard, you first need to specify whether a character separates the fields of data in the text file (a delimited text file) or whether the data is arranged in fixed-width columns. For delimited text files, you need to specify which character is used as the delimiter; for fixed-width files, you indicate where column breaks should occur.
The later pages of the Import Text wizard are similar to those you work with in the Import Spreadsheet wizard. You can name fields, specify a data type, indicate whether the field should be indexed, and skip a specific field. The wizard also prompts you to set up a primary key for the table.
Three of the other formats you can import are as follows:
![]() XML files Access uses the structure of the XML file to determine table names and fields. Import options include Structure Only, Structure And Data, and Append Data To Existing Table(s).
XML files Access uses the structure of the XML file to determine table names and fields. Import options include Structure Only, Structure And Data, and Append Data To Existing Table(s).
![]() SharePoint lists You provide the URL for the SharePoint site, and you might need to provide your user name and password to gain access to the site. If Access connects to the site successfully, the lists stored on the site are displayed, and you can then select the list or lists that contain the data you want to import. If you select more than one list, each list is imported as a separate table. Access uses the list’s name for the table name and the list’s columns as the table’s fields.
SharePoint lists You provide the URL for the SharePoint site, and you might need to provide your user name and password to gain access to the site. If Access connects to the site successfully, the lists stored on the site are displayed, and you can then select the list or lists that contain the data you want to import. If you select more than one list, each list is imported as a separate table. Access uses the list’s name for the table name and the list’s columns as the table’s fields.
![]() Outlook folders Importing a contacts or tasks folder from Outlook is an effective way to add this information to a database. Access runs the Import Exchange/Outlook wizard when you import data from Outlook. The wizard prompts you to provide field names, specify data types, and set up indexes. You can skip fields if you don’t want to import them.
Outlook folders Importing a contacts or tasks folder from Outlook is an effective way to add this information to a database. Access runs the Import Exchange/Outlook wizard when you import data from Outlook. The wizard prompts you to provide field names, specify data types, and set up indexes. You can skip fields if you don’t want to import them.
To import data from Excel into a new table
1. On the External Data tab, in the Import & Link group, click Excel.
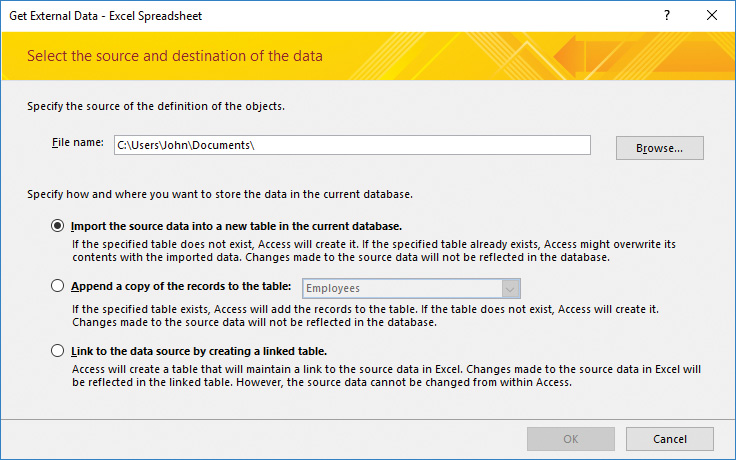
2. In the Get External Data dialog box, click Import the source data into a new table in the current database, click Browse to locate the source file, and then click OK.
3. In the Import Spreadsheet Wizard, select the worksheet or named range that has the data you want to import.
4. Click Next, and then work through the wizard to specify whether the first column of the data includes column headings, set field options, designate a primary key, and name the table.
5. Click Finish in the wizard. If you want to save the steps in this operation, in the Get External Data dialog box, select Save import steps.
To import data from another Access database
1. On the External Data tab, in the Import & Link group, click Access.
2. In the Get External Data dialog box, click Browse to locate the source database.
3. Click Import tables, queries, forms, reports, macros, and modules into the current database, and then click OK.
4. In the Import Objects dialog box, do either of the following:
• To import all the objects from the source database, click Select All.
• To import only specific objects from the source database, select objects you want to import.
5. Click Options, and then set the options for the import operation:
• In the Import area, click Relationships to preserve table relationships defined in the source database.
• In the Import Tables area, click Definition and Data or Definition Only.
• If you are importing queries, in the Import Queries area, click As Queries or As Tables.
6. In the Get External Data dialog box, do the following:
a. If you want to save the steps of the operation for reuse, select the Save import steps check box and provide a name and optional description for the steps.
b. Click Close.
To import data from a text file into a new table
1. On the External Data tab, in the Import & Link group, click Text File.
2. In the Get External Data dialog box, do the following:
a. Click Import the source data into a new table in the current database.
b. Click Browse. Navigate to and select the source file, and then click OK.
3. In the Import Text wizard, do the following:
a. Specify the format for the file you’re importing (Delimited or Fixed Width), and then click Next.
b. Choose the delimiting character or specify column breaks (depending on the format selected in step a). Select First Row Contains Field Names if this option applies.
c. Click Next, and then work through the remaining pages to set field options, designate a primary key, and name the table.
d. In the Import Text wizard, click Finish.
4. In the Get External Data dialog box, do the following:
a. If you want to save the steps of the operation for reuse, select the Save import steps check box and provide a name and optional description for the steps.
b. Click Close.
To import an XML file
1. On the External Data tab, in the Import & Link group, click XML.
2. In the Get External Data dialog box, do the following:
a. Click Browse to open the File Open dialog box. Locate and select the source file, and then click Open.
b. Click OK to open the Import XML dialog box.
3. In the Import Options area of the Import XML dialog box, do either of the following, and then click OK:
• To import only the XML file structure as the table’s definition, select Structure Only.
• To import the XML file structure and the data values, select Structure and Data.
4. In the Get External Data dialog box, do the following:
a. If you want to save the steps of the operation for reuse, select the Save import steps check box and provide a name and optional description for the steps.
b. Click Close.
To import a SharePoint list
1. On the External Data tab, in the Import & Link group, click More, and then click SharePoint List.
2. In the Get External Data dialog box, do the following:
a. In the Specify a SharePoint site box, enter the URL for the SharePoint site you want to connect to.
b. Click Import the source data into a new table in the current database, and then click Next.
3. On the Import data from list page, for each list that you want to import as a table, do the following:
a. Select the list check box.
b. In the Items to Import list, select All Pages or an option such as Recent Changes.
c. Click OK.
4. In the Get External Data dialog box, do the following:
a. If you want to save the steps of the operation for reuse, select the Save import steps check box and provide a name and optional description for the steps.
b. Click Close.
To import an Outlook folder as a table
1. On the External Data tab, in the Import & Link group, click More, and then click Outlook Folder.
2. In the Get External Data dialog box, click Import the source data into a new table in the current database, and then click OK.
3. If multiple mail profiles are configured on your computer, the Choose Profile dialog box opens. In the dialog box, select the profile you want to import from, and then click OK.
4. If prompted, enter the user name and password for your Outlook account.
5. In the Import Exchange/Outlook Wizard, do the following:
a. Select the folder you want to import, and then click Next.
b. Make changes to the field names or data types Access assigns to the folder’s contents, set the Indexed property for a field, or specify to skip a field. Then click Next.
c. Choose an option to have Access set a primary key, select your own key, or set no primary key. Then click Next.
d. Change the name of the table if you want to, and then click Finish.
6. In the Get External Data dialog box, do the following:
a. If you want to save the steps of the operation for reuse, select the Save import steps check box and provide a name and optional description for the steps.
b. Click Close.

