Objective 1.5 Print and export data
- 1.5.1 Print reports and records
- 1.5.2 Save a database as a template
- 1.5.3 Export data
OBJECTIVE 1.5: CONTENTS
1.5.1 Print reports and records
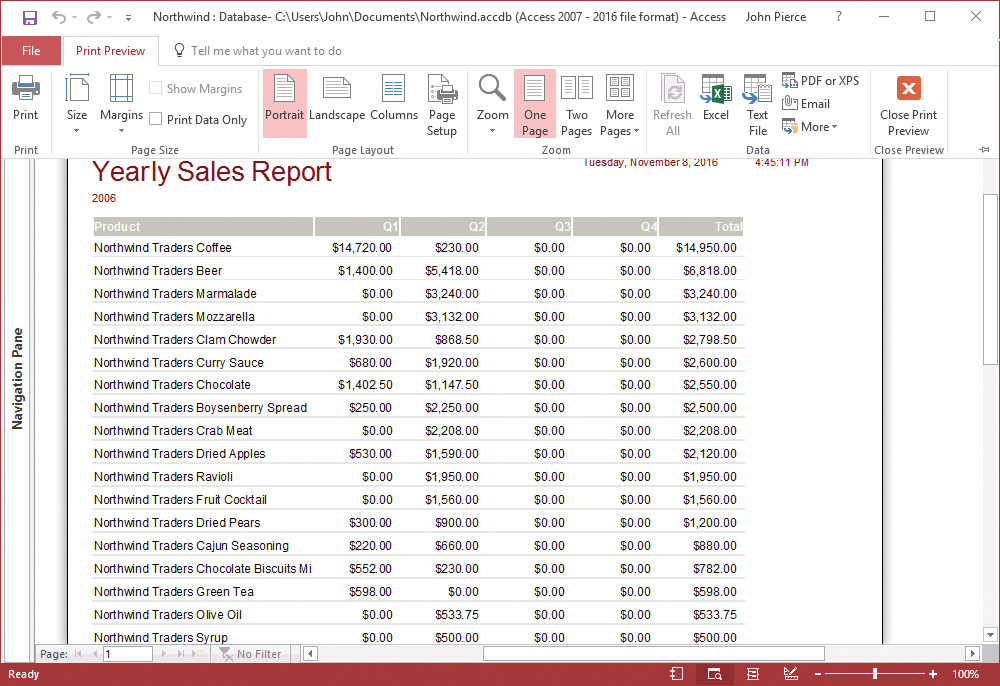
When you print a report, you can send the report directly to the default printer (without setting any printing options), use the Print dialog box to select a printer and set printing options, or work in print preview, a view that enables you to refine the report’s layout, view the report in different ways, and export the data.

A report open in print preview
The Print dialog box provides standard options with which you can specify a page range, set the number of copies, and adjust the page setup. It also provides an option for printing selected records. You must select the records you want to print before opening the Print dialog box. In general, you will print records that you select in a table or query that is open in Datasheet view.
When you display a report in print preview, Access provides commands to adjust page size and margins, change the page layout and page orientation (switching from portrait to landscape, for example), set up the report in columns, and view the report by zooming in and out or by displaying one or more pages. With these views, you can assess whether the report’s formatting is consistent, for example, or whether any important data might be missing. Many of the commands on the Print Preview tab are also available when you design and format a report in Design view or Layout view.
Tip: The Print Preview tab also provides a set of options (in the Data group) for exporting data to other programs or in various formats. These options are described in “Export data” later in this topic.
In the Page Size group on the Print Preview tab, the Show Margins option displays or hides the report’s margins, and the Print Data Only option removes elements such as column headings and information in page headers and footers from the report that Access prints.
You can open the Page Setup dialog box from the Page Size group, but many of the options in the Page Size and Page Layout groups duplicate options that the dialog box provides.
The range of zoom levels in print preview extends from 10 percent to a maximum of 1,000 percent (not all zoom levels apply to every object), but you can choose only preset options (such as 75% or 200%). The Zoom slider, in the lower-right corner of the Access window, adjusts the zoom level with greater flexibility. The Zoom group also lets you choose how many pages to display in a multipage report or printout. By default, one page is displayed. You can also display 2, 4, 8, or 12 pages.
To print a report directly to the default printer
![]() Right-click the report, and then click Print.
Right-click the report, and then click Print.
Or
1. Open the report from the Navigation Pane.
2. On the Print page of the Backstage view, click Quick Print.
To set printing options and print a report
1. Open the report from the Navigation Pane.
2. On the Print page of the Backstage view, click Print.
3. In the Print dialog box, set options for the print range, number of copies, and other printer properties. Then click OK.
To print selected records from a table or a query
1. Open the table or query in Datasheet view.
2. Select the records you want to print.
3. On the Print page of the Backstage view, click Print.
4. In the Print dialog box, do the following:
a. In the Print range area, click Selected Records. (If you don’t click Selected Records, Access prints all the records in the datasheet.)
b. Click OK.
To manage print and page setup options for a database object in print preview
1. Open the database object you want to print, if it is not already open.
2. On the Print page of the Backstage view, click Print Preview.
3. In the Page Size group, adjust paper size and margins and specify whether only data should be printed.
4. In the Page Layout group, set the page orientation, columns, and other page setup options.
5. In the Print group, click Print.
6. In the Print dialog box, set options for the number of copies and other printing options, and then click OK.