Objective 1.5 Print and export data
- 1.5.1 Print reports and records
- 1.5.2 Save a database as a template
- 1.5.3 Export data
OBJECTIVE 1.5: CONTENTS
1.5.3 Export data
One of the advantages of entering and maintaining data in a database is the capability to make the data available in other formats. For example, you can export data to use it in other programs and in other contexts. Data related to sales, budgets, orders, and other financial records can be exported to Excel for analysis. A list of contacts can be exported to a list in a SharePoint site or used in a mail merge in Word. Exporting data to a text file or to an XML file puts the data in a format that is compatible with other database and spreadsheet programs, and creating a PDF or an XPS file by using an export operation lets you distribute data in formats designed for review instead of analysis and editing.
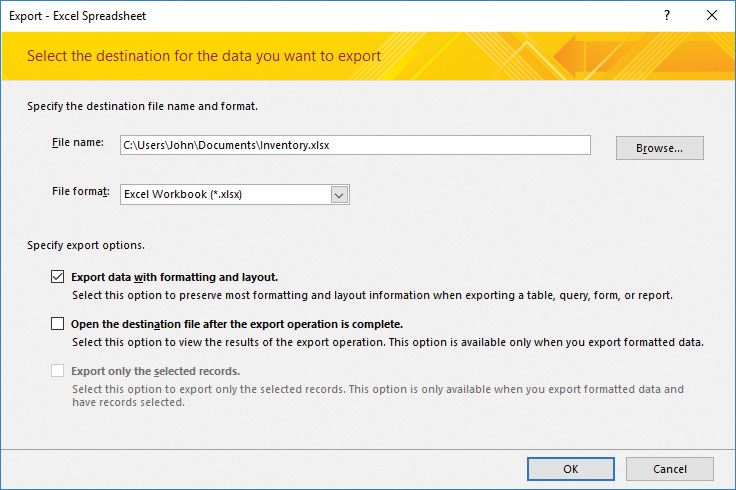
The Export dialog box provides options to maintain an object’s formatting and layout when you export it, view the exported file when the operation is complete, and export only selected records (in lieu of the complete record set that is contained in a specific table or query, for example). Specific operations, such as exporting to a text file, require you to set additional options that control where and how data is exported. You can also save export settings and then repeat an export operation in a single step.

Exporting data to an Excel workbook
The default setting for exporting data to Excel is the Excel Workbook file format (.xlsx). The options you can choose for a file format depend on the type of object you export. When you export records from a query, for example, you can keep Excel Workbook (.xlsx) or choose Excel Binary Workbook, Microsoft Excel 5.0/95 Workbook, or Excel 97–Excel 2003 Workbook. If you export a report, the file formats are limited to Microsoft Excel 5.0/95 Workbook and Excel 97–Excel 2003 Workbook.
The availability of export options also depends on the type of object. If you export a report, the Export Data With Formatting And Layout check box is selected by default and cannot be cleared. If you export a query or a table, you can select or clear the formatting and layout check box. By selecting that check box, you can open the destination file, and if you selected a subset of the records, you can then select the option to export only those records.
If you export an object’s complete record set, Access displays another dialog box, which has an option for saving the export steps. Saving the export steps saves time if you expect to run this export operation again using the same object and the same export settings.
When you export data to a text file, the steps you follow depend on whether you select the Export Data With Formatting And Layout option. When you select this option, Access displays the Encode As dialog box, which provides a choice of encoding schemes: Windows (Default), MS-DOS, Unicode, or Unicode (UTF-8). The Windows (Default) and MS-DOS options apply to text files that will be used only in programs that support these formats. Most programs consuming text files can use files encoded with the Unicode option. Unicode (UTF-8) is a format used widely on the web.
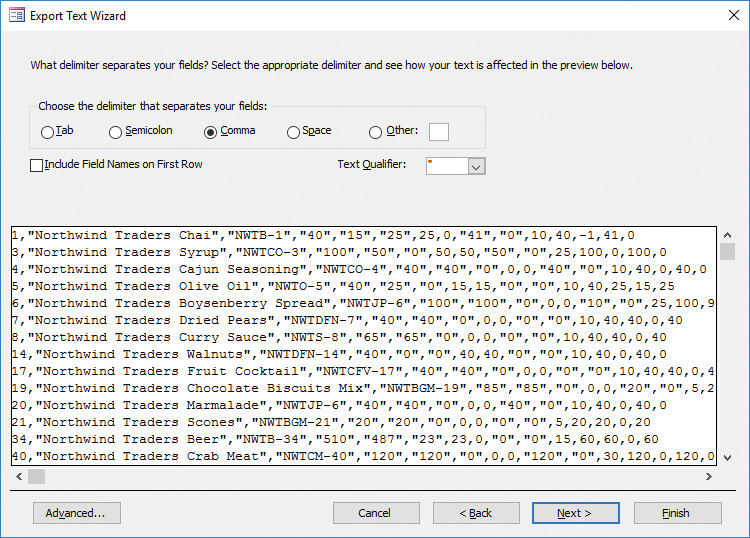
If you don’t select the Export Data With Formatting And Layout option, Access displays the Export Text Wizard. In export operations that rely on the Export Text Wizard, you specify whether to export the data as a delimited text file or as a fixed-width text file.

The Export Text Wizard
From this point, the Export Text Wizard displays screens that refine your initial choice. For example, for delimited text files, you specify the character that separates fields in each record (often a comma), whether to include field names in the first row of the exported file, and the text qualifier character (which is used to handle instances of the delimiting character that appear in actual values). For fixed-width exports, you use the wizard to indicate where field breaks occur by dragging lines to create columns.
When you export data to an XML file, you have the option to also export the schema for the data (an XSD file) and the presentation of the data (which is defined in an XSL file). For the data, you can export records in related tables in addition to the data in the object you selected. You can also specify an encoding scheme (UTF-8) or (UTF-16). Among the options related to exporting the schema are whether to include table and field properties and whether to embed the schema in the XML file or create a separate schema document. Presentation options include the location where the XLS file is stored, where related images are stored, and whether the XSL transformation is run from a client or a server computer. In the Run From area, the Client option creates an HTML file on the local computer that programmatically merges the XSL file and the data (XML) file. This option does not embed the presentation information in the data, which lets you update either the XSL file or the XML file without having to run the export operation again. The Server (ASP) option creates an Active Server Pages (ASP) file that merges the presentation with the data and sends the HTML file that is created to the local computer.
You can export database objects to another Access database or in the following formats:
![]() For a PDF or XPS file, you can export all the object’s data, selected records, or specific pages from a report. Both formats also provide options for accessibility.
For a PDF or XPS file, you can export all the object’s data, selected records, or specific pages from a report. Both formats also provide options for accessibility.
![]() The Email option in the Export group attaches a database object to email messages in a format that you select.
The Email option in the Export group attaches a database object to email messages in a format that you select.
![]() You can export the data in an object to use in a mail-merge operation in Word (the data becomes the recipient list associated with the mail merge) or save the data as a rich-text format (RTF) document.
You can export the data in an object to use in a mail-merge operation in Word (the data becomes the recipient list associated with the mail merge) or save the data as a rich-text format (RTF) document.
If you expect to use an export operation regularly, you can save the export steps you defined. By saving the export steps, you can run the operation in a single step.

Select the Save Export Steps check box to later perform the export in a single step
When you want to run a saved export in Access, on the External Data tab, in the Export group, click Saved Exports. Access opens the Manage Data Tasks dialog box. This dialog box provides options to run the export, create an Outlook task, modify the name or description provided earlier, and delete any saved exports (or saved imports) that you no longer need.
To export data from Access
1. Open the object that contains the data you want to export.
2. On the External Data tab, in the Export group, click the format or program you want to export to.
3. In the Export dialog box, specify the file name and location, and select the export options you want to use: to include formatting and layout, to view the exported file, and to export only selected records.
4. Depending on the export option you select in step 2, use the options in the dialog boxes and the wizards Access provides to specify file format and related export options.
To save export steps
1. In the Export dialog box, select Save export steps.
2. Enter a name for the export steps (or accept the default name) and enter a description.
3. If you want, select Create Outlook Task.
4. Click Save Export.
To run a saved export
1. On the External Data tab, in the Export group, click Saved Exports.
2. In the Manage Data Tasks dialog box, select the export operation you want to run, and then click Run.