Objective 2.3: Create and Modify Custom Workbook Elements (δείγμα)
- 2.3.1. Create and modify cell styles
- 2.3.2. Create custom themes and theme elements
- 2.3.3. Create and modify simple macros
- 2.3.4. Insert and configure form controls
OBJECTIVE 2.3: Contents
2.3.3. Create and modify simple macros
One of the secrets of Excel productivity is the automation of routine tasks through the use of command macros. A command macro is code that performs an action that has an effect on the Excel environment. For example, the macro might insert text into a worksheet cell or change an Excel option. In general, you can think of a command macro as being akin to a ribbon command. The key is that a single macro can consist of two, three, or even a dozen or more actions, each of which is performed, in sequence, when you run the macro.
Macros save time and increase efficiency in two ways:
![]() For short tasks that you run frequently Placing those tasks inside a macro is efficient because you can launch the macro with just one or two clicks or by pressing a keyboard shortcut.
For short tasks that you run frequently Placing those tasks inside a macro is efficient because you can launch the macro with just one or two clicks or by pressing a keyboard shortcut.
![]() For long tasks Having these tasks in a macro is fast because although the entire procedure might take you several minutes manually, the macro might take only a few seconds.
For long tasks Having these tasks in a macro is fast because although the entire procedure might take you several minutes manually, the macro might take only a few seconds.
Although you can create macros manually by using the Microsoft Visual Basic for Applications (VBA) Editor, it is often easier to create a macro by using the Macro Recorder. With this method, you start the recorder, and then you run through the tasks you want to automate (which might include selecting cells, running ribbon commands, and choosing dialog box options). The Recorder translates everything into the appropriate Visual Basic for Applications statements and copies those statements to a macro in a module. You can then use the recorded macro to replay the entire procedure any time you want. After you have recorded a macro, you can modify it by adding a description, assigning a shortcut key, or deleting the macro.
To open the Record Macro dialog box
![]() On the Developer tab, in the Code group, click Record Macro.
On the Developer tab, in the Code group, click Record Macro.
- See Also: For information about how to display the Developer tab, see “Hide or display ribbon tabs” in “Objective 1.1: Manage workbooks.”
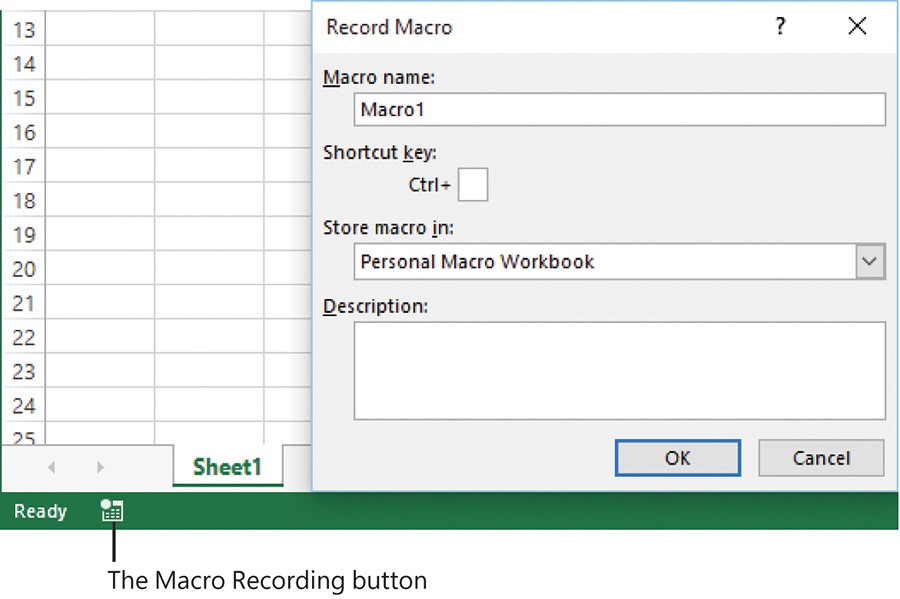
![]() Near the left end of the Excel status bar, click the Macro Recording button. (If the button isn’t on the status bar, right-click the status bar, and then click Macro Recording.)
Near the left end of the Excel status bar, click the Macro Recording button. (If the button isn’t on the status bar, right-click the status bar, and then click Macro Recording.)

You must provide a name and storage location for the macro before you record it
To record a simple macro
1. Open the Record Macro dialog box.
2. In the Macro name box, change the name to something memorable or descriptive. You must follow these guidelines when naming your macros:
• The name must be 255 or fewer characters.
• The first character must be a letter or an underscore (_).
• No spaces or periods are allowed.
3. In the Shortcut key box, assign an optional shortcut key to the macro.
- Important: Excel shortcut keys are case-sensitive, which means that you can create separate shortcuts with uppercase and lowercase letters. Also, make sure you don’t specify a shortcut key that conflicts with built-in shortcuts (such as Ctrl+B for Bold or Ctrl+C for Copy). If you use a key that clashes with an Excel shortcut, Excel overrides its own shortcut and runs your macro instead (if the workbook containing the macro is open).
4. In the Store macro in list, specify where the macro will reside. You can store the macro in the current workbook, a new workbook, or in the Personal Macro Workbook. If you use the Personal Macro Workbook, your macros will be available to all of your workbooks.
5. In the Description box, enter an optional description of the macro.
6. Click OK to return to the workbook and start recording.
7. Perform the tasks you want to include in the macro. Here are some things to bear in mind during the recording:
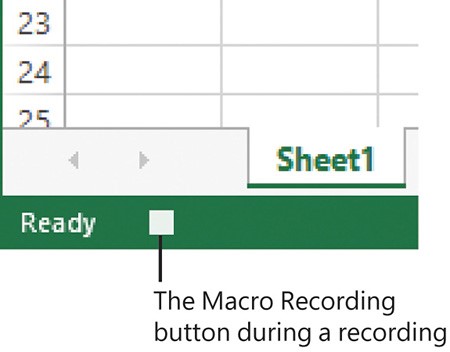
• Excel gives you just one indication that a recording is in progress: the status bar’s Macro Recording button changes to a square.
• Excel makes the mouse available for all actions.
• Because the Macro Recorder takes note of everything you do, be careful not to perform any extraneous keyboard actions or mouse clicks during the recording.

During a recording, the Macro Recording status bar button changes to a square
8. When you finish the tasks, do either of the following to stop recording the macro:
• On the Developer tab, in the Code group, click Stop Recording.
• On the status bar, click the Macro Recording button.
To modify a macro
1. On the Developer tab, in the Code group, click Macros to open the Macro dialog box.
2. Click the macro you want to modify, and then click Options to open the Macro Options dialog box.
3. Do any of the following, and then click Close to return to the Macro dialog box:
• In the Shortcut key: Ctrl+ box, assign a shortcut key to the macro.
• In the Description box, enter a description of the macro.
4. Click Cancel to close the Macro dialog box.
To run a macro
![]() In the Macro dialog box, click the macro you want to run, and then click Run.
In the Macro dialog box, click the macro you want to run, and then click Run.
![]() If you assigned a shortcut key to the macro, press the shortcut key.
If you assigned a shortcut key to the macro, press the shortcut key.
To delete a macro
1. In the Macro dialog box, click the macro you want to remove, and then click Delete. Excel asks you to confirm.
2. Click Yes to delete the macro.