Objective 2.1: Apply Custom Data Formats and Validation (δείγμα)
- 2.1.1. Create custom data formats
- 2.1.2. Populate cells by using advanced Fill Series options
- 2.1.3. Configure data validation
OBJECTIVE 2.1: Contents
2.1.3. Configure data validation
Formulas are only as good as the data they’re given. For basic data entry errors (for example, entering the wrong date or transposing a number’s digits), there’s not much you can do other than exhort yourself or the people who use your worksheets to enter data carefully. Fortunately, you have a bit more control when it comes to preventing the entry of improper data such as data that is the wrong type (for example, entering text in a cell that requires a number) or data that falls outside of an allowable range (for example, entering 200 in a cell that requires a number between 1 and 100).
You can prevent these kinds of improper entries, to a certain extent, by adding comments that describe what is allowable inside a particular cell. However, this requires other people to both read and act on the comment text. You can also use custom numeric formatting to “format” a cell with an error message if the wrong type of data is entered. This is useful, but it works only for certain kinds of input errors.
The best solution for preventing data entry errors is to use the data-validation feature of Excel. With data validation, you create rules that specify exactly what kind of data can be entered and in what range that data can fall. You can also specify pop-up input messages that appear when a cell is selected, and error messages that appear when data is entered improperly.
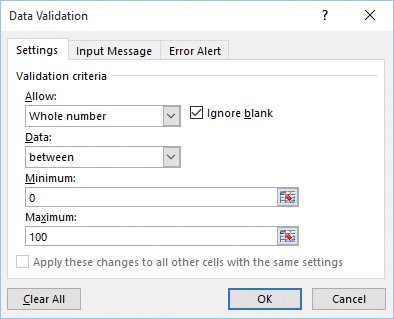
You configure data-validation rules on the Settings tab of the Data Validation dialog box. The following validation types are available:
![]() Any Value Allows any value in the range (that is, it removes any previously applied validation rule). If you’re removing an existing rule, be sure to also clear the input message, if any.)
Any Value Allows any value in the range (that is, it removes any previously applied validation rule). If you’re removing an existing rule, be sure to also clear the input message, if any.)
![]() Whole Number Allows only whole numbers (integers). You use the Data list to select a comparison operator (such as Between, Equal To, or Less Than) and then enter the specific criteria. For example, if you click the Between option, you must enter Minimum and Maximum values.
Whole Number Allows only whole numbers (integers). You use the Data list to select a comparison operator (such as Between, Equal To, or Less Than) and then enter the specific criteria. For example, if you click the Between option, you must enter Minimum and Maximum values.
![]() Decimal Allows decimal numbers or whole numbers. You use the Data list to select a comparison operator and then enter the specific numeric criteria.
Decimal Allows decimal numbers or whole numbers. You use the Data list to select a comparison operator and then enter the specific numeric criteria.
![]() List Allows only values specified in a list. You specify the allowable values in the Source box on the Settings tab of the Data Validation dialog box, either by specifying a range on the same sheet or a range name on any sheet that contains the list of allowable values (preceding the range or range name with an equal sign) or by entering the allowable values directly into the Source box (separated by commas). You have the option of allowing the user to select from the allowable values by using a drop-down list.
List Allows only values specified in a list. You specify the allowable values in the Source box on the Settings tab of the Data Validation dialog box, either by specifying a range on the same sheet or a range name on any sheet that contains the list of allowable values (preceding the range or range name with an equal sign) or by entering the allowable values directly into the Source box (separated by commas). You have the option of allowing the user to select from the allowable values by using a drop-down list.
![]() Date Allows only dates. (If the user includes a time value, the entry is invalid.) You use the Data list to select a comparison operator and then enter the specific date criteria (such as a Start date and an End date).
Date Allows only dates. (If the user includes a time value, the entry is invalid.) You use the Data list to select a comparison operator and then enter the specific date criteria (such as a Start date and an End date).
![]() Time Allows only times. (If the user includes a date value, the entry is invalid.) You use the Data list to select a comparison operator and then enter the specific time criteria (such as a Start time and an End time).
Time Allows only times. (If the user includes a date value, the entry is invalid.) You use the Data list to select a comparison operator and then enter the specific time criteria (such as a Start time and an End time).
![]() Text Length Allows only alphanumeric strings of a specified length. You use the Data list to select a comparison operator and then enter the specific length criteria (such as Minimum and Maximum lengths).
Text Length Allows only alphanumeric strings of a specified length. You use the Data list to select a comparison operator and then enter the specific length criteria (such as Minimum and Maximum lengths).
![]() Custom You can use this option to enter a formula that specifies the validation criteria. You can either enter the formula directly into the Formula box on the Settings tab of the Data Validation dialog box (again preceding the formula with an equal sign) or enter a reference to a cell that contains the formula. For example, if you’re restricting cell A2 and you want to be sure the entered value is not the same as what’s in cell A1, you would enter the formula =A2<>A1.
Custom You can use this option to enter a formula that specifies the validation criteria. You can either enter the formula directly into the Formula box on the Settings tab of the Data Validation dialog box (again preceding the formula with an equal sign) or enter a reference to a cell that contains the formula. For example, if you’re restricting cell A2 and you want to be sure the entered value is not the same as what’s in cell A1, you would enter the formula =A2<>A1.

On the Settings tab of the Data Validation dialog box, set up the criteria for your validation rule
To configure data validation for a cell or range
1. Select the cell or range to which you want to apply the data-validation rule.
2. On the Data tab, in the Data Tools group, click Data Validation to open the Data Validation dialog box.
3. On the Settings tab, in the Allow list, click one of the validation types.
4. Enter the validation criteria you require.
5. To allow blank entries, either in the cell itself or in other cells specified as part of the validation settings, leave the Ignore blank check box selected. If you clear this check box, Excel treats blank entries as zero and applies the validation rule accordingly.
6. If the range had an existing validation rule that also applied to other cells, you can apply the new rule to those other cells by selecting the Apply these changes to all other cells with the same settings check box.
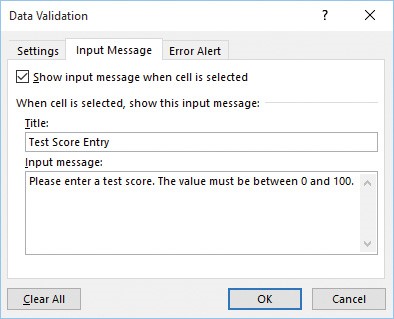
7. If you want a message to appear when the user selects the restricted cell or any cell within the restricted range, on the Input Message tab, do the following:
a. Verify that the Show input message when cell is selected check box is selected.
b. In the Title box, enter a title for the message.
c. In the Input message box, enter the message that you want Excel to display. For example, you could use the message to give the user information about the type and range of allowable values.

You can configure an input message to appear when a workbook user selects the cell
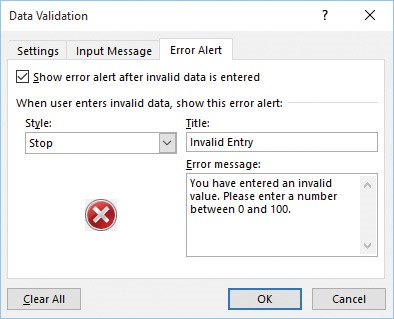
8. If you want a dialog box to appear when the user enters invalid data, click the Error Alert tab, and then do the following:
a. Select the Show error alert after invalid data is entered check box.
b. In the Style list, click the error style you want: Stop, Warning, or Information.
c. In the Title box, enter a title for the message.
d. In the Error message box, enter the message that you want Excel to display.
- Important: Only the Stop style prevents users from entering invalid data.

You can configure an error alert to appear when a workbook user enters an invalid entry
9. Click OK to apply the data-validation rule.