Objective 1.1: Manage Documents And Templates
- 1.1.1 Modify existing templates.
- 1.1.2 Copy custom styles, macros, and building blocks to other documents or templates.
- 1.1.3 Manage document versions.
- 1.1.4 Compare and combine multiple documents.
- 1.1.5 Link to external document content.
- 1.1.6 Enable macros in a document.
- 1.1.7 Change default program settings
- 1.1.7a Display hidden ribbon tabs.
- 1.1.7b Change the application default font.
Compare and combine documents
When you work with other authors and reviewers on multiple copies of the same document, you can collect the copies and then use the Combine command to merge the documents and produce a single document that displays and identifies revisions.
Other times you might simply want to compare two versions of a document to view how the versions differ. In this instance, you aren’t concerned about who made revisions; you just want to know how the content in one version compares with the content in the other.
The Compare and Combine commands on the Review tab provide similar results when you merge documents, but you apply these commands in different circumstances.
- Use Compare when you want to view the differences between two versions of a document.
- Use the Combine command to merge revisions made in multiple copies of a document and to identify who made the revisions.
When you compare two versions of a document, the differences between the original document and the revised document are shown in the original document (or in a new document) as tracked changes. To get the best results when you use the Compare command, make sure that the original and the revised documents do not contain any tracked changes. If either document does, Word treats the changes as accepted when it compares the documents.
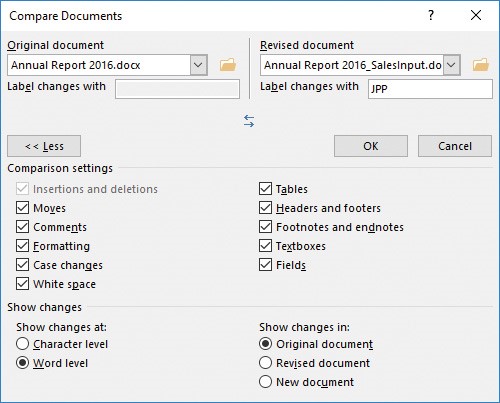
In the Compare Documents dialog box, you select the original document and the revised document, choose settings for the types of changes Word will mark, and specify whether Word shows the results of the comparison in the original document, the revised document, or a new document.

Clear check boxes of elements that you don’t want to compare
By default, all the options in the Comparison Settings area are selected. You can clear the check box for any option other than Insertions And Deletions. If you don’t need to view formatting differences, for example, clear the Formatting option. If you are interested chiefly in comparing the differences in the main body of each document, you might also clear the check boxes for Comments, Case Changes (whether a character is lowercase or uppercase), White Space, Headers And Footers, and Fields. In the Show Changes area, Word Level is selected by default. Select the Character Level option if you want Word to mark when a change is made to a few characters of a word, such as when only the case of the first letter is changed. At the word level, the entire word is shown as a revision when the documents are compared; at the character level, only the letter is shown as a revision.
In the Show Changes In area, you can select Original Document to display the differences in that document (although you might not want to alter the original document in that way). Or you can select Revised Document to add changes to that document or New Document to create a document based on the original, with the differences made in the revised document shown with tracked changes.
The differences that are shown in the document created by a comparison are attributed to a single author. You can use the Previous and Next buttons in the Changes group on the Review tab to move from change to change, view the changes, and accept or reject the differences.
See Also: For information about accepting and rejecting changes, see “Manage tracked changes” in “Objective 1.3: Manage document changes.”
You can also view the compared, original, and revised document at the same time (if that isn’t the view Word provides when it completes the comparison) by clicking Show Source Documents on the Compare menu and then clicking Show Both. Other options on the Show Source Documents menu include Hide Source Documents (which removes the original and the revised document from the view, keeping the compared document), Show Original, and Show Revised.
The Combine Documents dialog box is set up in essentially the same way as the Compare Documents dialog box. When you combine documents, differences between the original and revised documents are shown as tracked changes. If a revised document includes tracked changes, these changes are also displayed in the combined document as tracked changes. Each reviewer is also identified in the combined document.
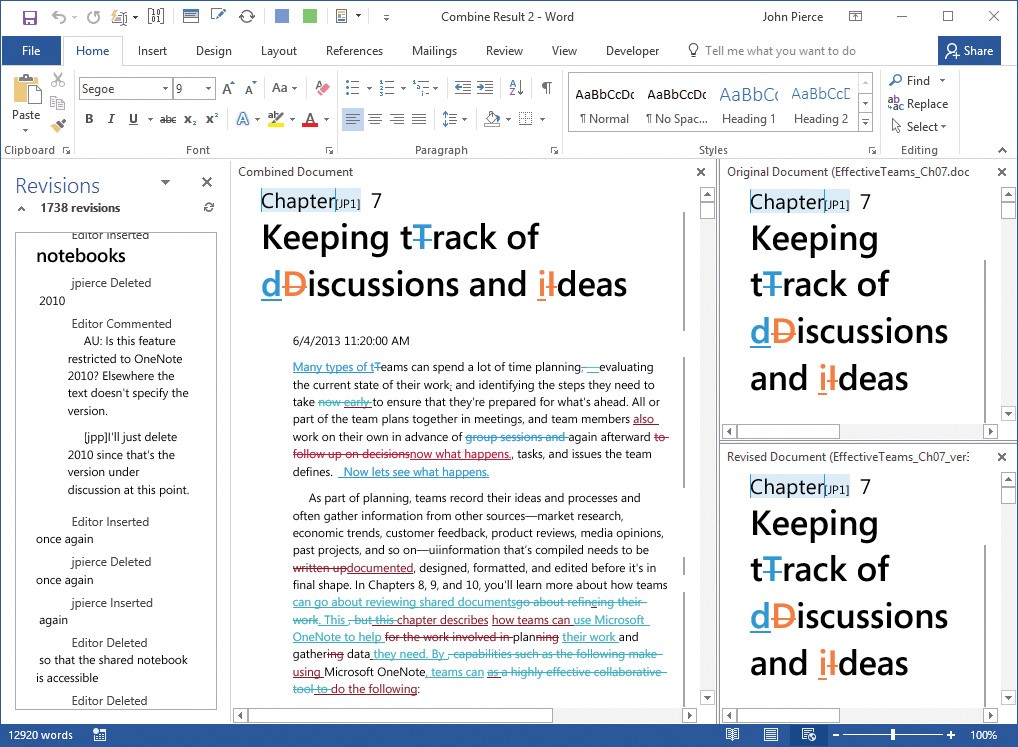
When you click OK in the Combine Documents dialog box, Word is likely to display a message box telling you that only one set of formatting changes can be stored in the merged document. You need to choose between the changes in the original document or the revised document to continue merging the documents. Word displays the results of combining the documents in a set of windows that shows the combined document in a central pane and the original and revised documents in smaller panes at the right.
Word also displays the Revisions pane along the left side of the window.

When comparing documents, Word displays the original, the revision, and a combined version
Tip: In the window that Word displays after you combine documents, you can scroll through the combined document and the original and revised documents at the same time. Your location in each document is synchronized, so you can refer to any of the documents as you need to.
You can combine another copy of the document with the merged document by choosing Combine from the Compare menu again, selecting the combined result document as the original document, and selecting the next file you want to merge.
After you save and name the combined document, you can open that document and work through the variations (indicated by tracked changes), accepting and rejecting them to achieve a final document.
To compare documents
1. Do any of the following:
• Open a blank document.
• Open the original document.
• Open the revised document.
2. On the Review tab, in the Compare group, click Compare, and then click Compare on the menu.
3. In the Compare Documents dialog box, select the original document (if it isn’t already selected) from the list or by clicking the folder icon and browsing to the location where the document is saved.
4. Select the revised document you want to compare with the original document.
5. In the Label changes with box for the revised document, specify the user name or initials you want to attribute differences to.
6. If the Comparison settings area is not displayed, click More.
7. In the Comparison settings area, clear or select the check boxes to specify the document elements you want Word to use in its comparison.
8. In the Show changes at area, choose whether to show changes at the character level or at the word level.
9. In the Show changes in area, choose where you want Word to show changes: in the original document, in the revised document, or in a new document.
10. Click OK. If Word prompts you about tracked changes, click Yes to complete the comparison.
To combine two or more documents
1. Open a blank document in Word. (You can also start with the original document or one of the revised documents open.)
2. On the Review tab, in the Compare group, click Compare, and then click Combine.
3. In the Combine Documents dialog box, select the original document (if it isn’t already selected) from the list or by clicking the folder icon and browsing to the location where the document is saved.
4. Select the revised document you want to combine with the original document.
5. In the Label changes with box for the original and revised document, specify the user name or initials you want to attribute differences to.
6. If the Comparison settings area is not displayed, click More.
7. In the Comparison settings area, clear or select the check boxes to specify the document elements you want Word to use in its comparison.
8. In the Show changes at area, choose whether to show changes at the character level or at the word level.
9. In the Show changes in area, choose where you want Word to show changes: in the original document, in the revised document, or in a new document.
10. Click OK.
11. In the message box, specify whether to use formatting in the original document or the revised document.
12. Click Continue with Merge.