Objective 1.6 Configure a presentation for print
- 1.6.1 Configure a presentation for print
1.6 Contents
1.6.1 Configure a presentation for print
A PowerPoint presentation can include many types of information; the information on the slides is intended for the audience, and the information stored in the slide notes is usually intended for the presenter.
Tip: If you use speaker notes when delivering a presentation to an audience, you can enter text in the Notes pane in Normal view. If you want speaker notes that include pictures or other supporting materials in addition to text, you can develop the speaker notes in Notes Page view.
You can print various forms of the presentation for different purposes. You can select from standard print layout options for slides, notes pages, outlines, and handouts.

Options for printing slides, notes, and handouts
When you are ready to print, you can adjust any of the following settings:
- Specify the printer to use You can specify the printer you want to use and set its properties (such as paper source and image compression).
- Specify which slides to print You can print all the slides, the selected slides, or the current slide. You can print only specific slides by clicking the Slides box and entering slide numbers and ranges separated by commas (no spaces). For example, enter 1,5,10-12 to print slides 1, 5, 10, 11, and 12.
- Print hidden slides You can include slides in the printed version that will be hidden in the electronic presentation.
- Specify what to print You can print slides (one per page), notes pages (one half-size slide per page with space for notes), an outline, or handouts. When printing handouts, you can specify the number of slides that print on each page (1, 2, 3, 4, 6, or 9) and the order in which the slides appear on the page.
- Put a frame around slides You can print a frame around the slides on the printed page.
- Scale slides to fit the paper If you haven’t set the size of the slides to match the size of the paper in the printer, PowerPoint can automatically reduce or increase the size of the slides to fit the paper when you print them.
- Print in high quality For final output, you can specify that the slides be printed in the printer’s highest quality.
- Print comments and ink markup You can print electronic or handwritten notes attached to the presentation so that you can review them along with the slides.
- Print and collate multiple copies If you want to print multiple copies of a presentation, you can specify whether complete copies should be printed one at a time.
- Specify the color range You can print your presentation in color (color on a color printer and grayscale on a monochrome printer), grayscale (on a color or monochrome printer), or pure black and white (no gray on either a color or monochrome printer).
Tip: Most presentations are created in color. The Grayscale option prints grayscale versions of the colors, but the Pure Black And White option removes colored backgrounds. Be sure to review the presentation in the print mode you select before printing it to ensure that all the necessary content is visible.
To print all or part of a presentation
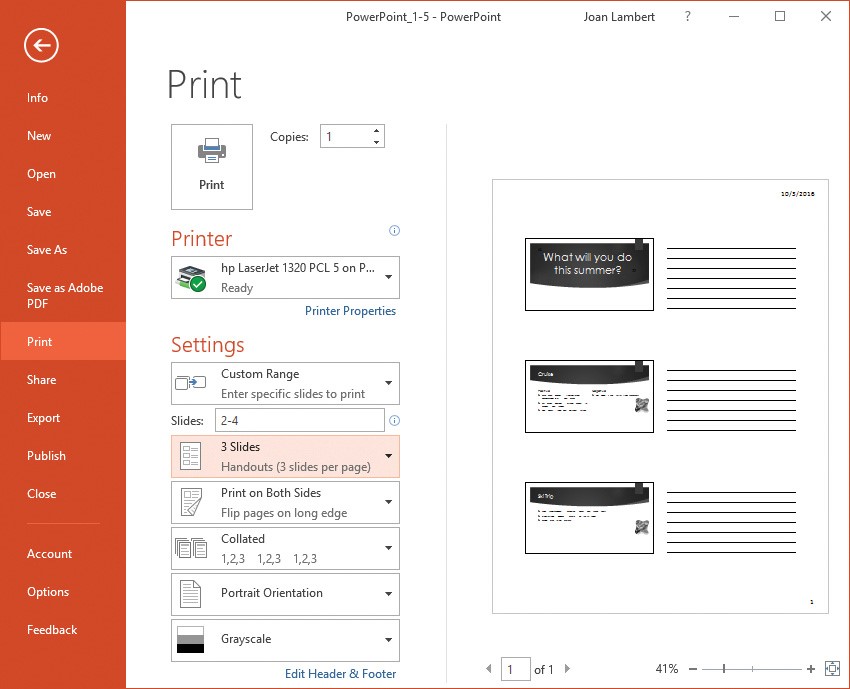
- On the Print page of the Backstage view, do any of the following, and then click Print:
- In the first list in the Settings area, click Print All Slides, Print Selection, or Print Current Slide.
- In the first list in the Settings area, click Custom Range and then, in the Slides box, enter the slides you want to print.
- In the Slides box, enter the slides you want to print.

The Print page of the Backstage view
To print speaker notes
- On the Print page of the Backstage view, in the second list in the Settings area, in the Print Layout gallery, click Notes Pages. Configure any additional print settings, and then click Print.
To print handouts
- In the second list in the Settings area, in the Handouts gallery, click the handout configuration you want. Configure any additional print settings, and then click Print.
To configure print colors for a presentation
- On the Print page of the Backstage view, in the final list in the Settings area, click Color, Grayscale, or Pure Black and White.